Quick Guide: Setting Up Your Own MySQL Instance Using Google CloudSQL
Holistics helps you present any queries from your database as online reports and dashboards.
As Holistics does not store your data, you will need to BYOD (bring your own database). However, you may not know how to get started with setting your database as a non-technical user.
In this guide, we will show you how to set up your very own basic mySQL instance database that is affordable with Google CloudSQL.
Once you've set up your database instance, you can feel free to update any data you want with it, and to connect it with Holistics.
Once this is done, you can enjoy the following benefits:
- An easy and super affordable database instance on the cloud that is virtually free from maintenance efforts.
- You can stop the database instance anytime and you won't need to pay extra for its uptime.
- You can learn how to store data into your database, and get to learn how to use SQL to extract different kinds of tabular data you have collected
- Once you've connected your database to Holistics, you will enjoy the ability to chart and visualize your data the way you want it!
Holistics also allow you an easy way to sync data from your spreadsheets into your own database that you curate!
You are no longer bounded by the limitations of Excel or Google Sheets to process your data. You have your data online anytime you need it!
Now let's get started. First sign up with the Google Cloud Platform and clear all their billing requirements. They won't charge you till you give your permission to have your card charged.
Creating your instance
-
Then go to the launcher, and choose Google CloudSQL >>
Launch a new instance -
Click on
Create Instance
-
Give an instance name (note this is different from your database name - Don't get confused). In this case, we name it my-first-db, and select
D0 (128MB RAM)(the smallest instance). Wait for your database to be ready.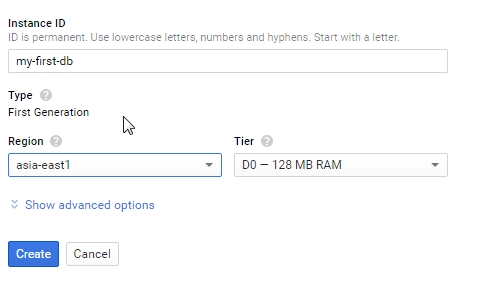
-
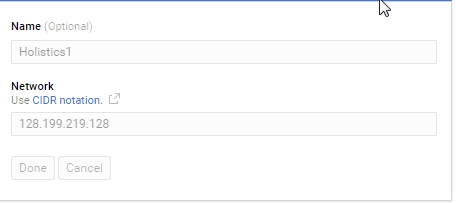
Once it's ready, click on the database name and go to Access Control. Under Authorized Networks, whitelist the following 2 Holistics nodes (you should be able to find this easily from our docs). Click on
Savewhen done.
Creating your user account
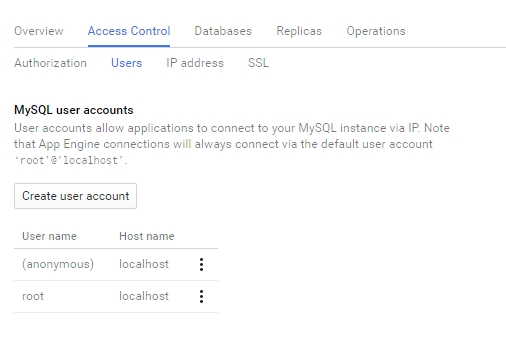
Go to Access Control > Users > create user account and key in your user name and password
Getting your IP address
-
Go to
Access Control>IP addressand request an IPv4 address. Remember the IPv4 address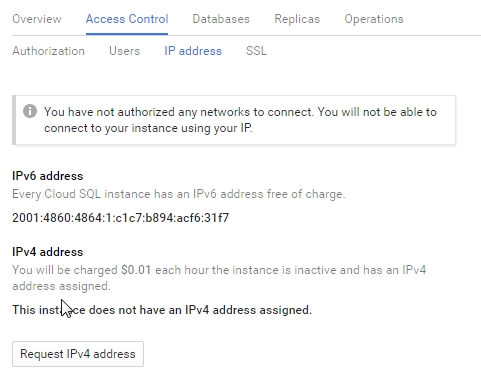
-
Go to Databases, and add
New Database. Remember the name of this database
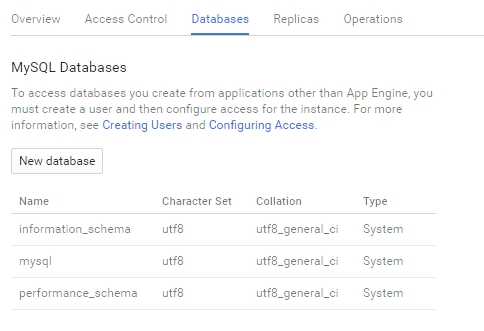
That's it! You are done! Now log in to Holistics, click on Admin, and access your data source.
Fill up the following in the data source
- Name: The display name you want to show it Holistics. You can give it any name
- Database Type: Select mySQL
- Host: Put in the IPv4 address (Step 7) above
- Port: Leave it empty
- Database Name: Put in the name of your database name (Step 8 above)
-User Name and Password: What you have created in Step 6 above.
-Click onand you should see it being successful!
Kudos to Google for making this set-up process so pain-free without the need to mess around phpmyAdmin to get started! You can even create backup policies and set up replicas with a single click.
— — — — — — — — — — — —
•
Having problems finding a simple and affordable data reporting system for your startups? Check us out at holistics.io.
What's happening in the BI world?
Join 30k+ people to get insights from BI practitioners around the globe. In your inbox. Every week. Learn more
No spam, ever. We respect your email privacy. Unsubscribe anytime.

